Essential tools and techniques#
Contents
The tools and why we use them#
We hope that the principles and strategies outlined in this book will transcend any particular software platform or programming language, but for the purposes of explication we will focus on a particular language (Python) and a particular set of tools for software development/engineering and AI coding assistance. Here we briefly outline our motivation for these particular tools.
Why Python?#
For the coding examples in this book we will use the Python programming language. We have chosen Python first and foremost because it is a language that we know well, as well as being one of the most popular languages today in science. Python is a relatively high level programming language, which means that it can be understandable (if written correctly) even by someone with relatively little experience. It is also free and open source, which means that anyone with a computer can download it and run it at no cost. In addition, Python is a language that has exceptionally good support from AI coding assistants such as GitHub Copilot, which has been trained on a huge corpus of Python code (along with code from many other languages as well). Python also has a large and growing ecosystem of packages and tools that make it possible to solve many different problems easily. If you are interested in working on machine learning or AI, the tools in Python are especially good.
Across many different domains of science there are specialized Python packages to solve domain-specific problems: Examples include astropy (astronomy), geopandas (geospatial sciences), quantecon (economics), sunpy (solar physics), and psychopy, just to name a few. We should note that different scientific communities have often converged on particular high-level languages. The above are some examples of Python packages, but in some fields the ecosystem is much more elaborated in R, Julia, Perl or Matlab. We hope that most of the lessons in this book will be relevant to these other languages as well.
If you don’t already know Python, then we suggest that you try to follow along with the examples anyway; our aim is to write them in a way that anyone with a general knowledge of programming should be able to read and understand them. In some cases we may use programming constructs that are specific to Python; if you are coming from another language and you see something you don’t understand, then we would recommend asking an AI assistant to explain it to you, since current AI tools are very good at explaining the intent of Python code! As we discuss in Chapter XXX, learning a new programming language is a great way to expand your programming skills, and Python is currently a great language to learn.
Version control#
Scientists in many fields have traditionally kept a lab notebook to record their experimentation. This is still the case in domains such as biology where the work often involves manual experimentation at a lab bench. Many such labs have moved to using electronic lab notebooks, making it much easier to search and find relevant information. However, an increasing amount of scientific work is now computational, and for this work it would seem somewhat inefficient to record information about the software development process separately from the code that is being written. There is in fact a tool that can provide the computational researcher with an integrated way to record the history their work, known as version control. While there are many tools that can be used to perform version control, git has become by far the most prevalent within the scientific computing ecosystem, largely due to the popularity of the GitHub website that enables the hosting and sharing of git repositories.
In this section we will assume that the researcher has a basic knowledge of the git software tool; for researchers looking to learn git, there are numerous resources online, which we will not duplicate; see the suggested resources at the end of this chapter.
Here we will focus on the ways in which version control tools like git can serve as important tools to improve scientific coding.
While there are numerous graphical user interfaces (GUIs) for git (including those offered by various IDEs), we will focus on its use via the command line interface (CLI).
Every researcher should have a basic knowledge of the git CLI, since this is a ubiquitous interface available across all OSes and environments.
The CLI is sometimes the only interface that is available to the researcher, e.g. in a remote session on an HPC system or in the cloud.
Moreover, the CLI provides an immediate exposure to available commands (run git --help) and options for each command (run git COMMAND --help), allowing users to discover a command or option that might not (yet) be exposed by any particular GUI tool.
How version control works#
The goal of a version control system is to provide an annotated history of all changes that occur to the tracked files.
Here we will provide a brief overview of the conceptual structure of version control, using the git system as our example.
The general workflow for version control using git is as follows:
Initial check-in: A file is added to the database.
The file is modified by the user, but the changes are not added to the database.
The file is added to the staging area, which tracks the changes in the file and marks the new version to be added to the database.
The file is committed, which stores it in the base along with a commit message that describes the changes.
TODO: Provide visualizations for git/github concepts?
Here is an example using git.
We will create a test directory (outside of our current git repository) and initialize it as a git repository:
> cd /tmp
> mkdir git-test
> cd git-test
> git init
> echo "test file" > test_file.txt
> git status
On branch main

No commits yet

Untracked files:
  (use "git add <file>..." to include in what will be committed)
	test_file.txt

nothing added to commit but untracked files present (use "git add" to track)
So far our new file is not being tracked, but we can add it to the database:
> git add test_file.txt
> git status
On branch main

No commits yet

Changes to be committed:
  (use "git rm --cached <file>..." to unstage)
	new file:   test_file.txt
It’s now in the staging area, but hasn’t yet been committed to the database, as we can see if we print the log:
> git log
fatal: your current branch 'main' does not have any commits yet
We can commit the items in the staging area (in this case, just our single added file) to the database and provide a message that labels the commit:
> git commit -m"initial add"
[main (root-commit) 752ca80] initial add
 1 file changed, 1 insertion(+)
 create mode 100644 test_file.txt
> git status
On branch main
nothing to commit, working tree clean
Now that all changes have been committed, we are “clean”, meaning that the files in the directory match exactly to those in the database. We can see the commit in the git log:
> git log
commit 752ca809cd662f846434dcb2c81f3000db640b4e (HEAD -> main)
Author: Russell Poldrack <poldrack@gmail.com>
Date:   Mon Feb 17 07:42:35 2025 -0800

    initial add
The long string (starting with “752”) is the hash for this commit. This is a value (generated by a cryptographic algorithm called SHA-1) that uniquely represents all of the changes that were made in this commit. For example, if we had used a different commit message then the hash would be different. The commit hash is the way that we refer to commits - for example, if we wanted to change the state of our repository back to an earlier commit we would use the hash of that earlier commit. We usually don’t need to use the entire hash; the first ~8 letters are usually sufficient.
The most important role for version control is to track changes in a file, along with notes about those changes. That is, it can serve as a digital version of a lab notebook! Let’s make a change to the file to see this in action:
> echo "another line" >> test_file.txt # add another line of text
> git diff test_file.txt
diff --git a/test_file.txt b/test_file.txt
index 16b14f5..0db3737 100644
--- a/test_file.txt
+++ b/test_file.txt
@@ -1 +1,2 @@
 test file
+another line
This provides us with a (somewhat cryptic) description of the changes to the file; the line starting with a “+” denotes the content that was added (in the console this would also be color-coded in green). We can then add and commit the file and then view the new commit in the log:
> git add test_file.txt
> git commit -m"added a second line"
[main 5e8c41a] added a second line
 1 file changed, 1 insertion(+)
> git log

commit 5e8c41a075b2ab2d954d59cab6530d924c5e3e6a (HEAD -> main)
Author: Russell Poldrack <poldrack@gmail.com>
Date:   Mon Feb 17 07:56:09 2025 -0800

    added a second line

commit 752ca809cd662f846434dcb2c81f3000db640b4e
Author: Russell Poldrack <poldrack@gmail.com>
Date:   Mon Feb 17 07:42:35 2025 -0800

    initial add
Now we can see our latest commit at the top of the list.
If we were to push our repository to GitHub, then we could also see a much more user-friendly graphical view of commit history and the changes that occurred in each commit.
Most IDEs also have an interface to work directly with git; for example, within VSCode there is a Source Control panel that would allow one to do everything that we did above using the command line.
Version control as a lab notebook#
It is essential for a researcher to keep track of their work as it proceeds, and traditionally this has been done using a written lab notebook. This has several drawbacks; it’s impossible to search easily, and for researchers with terrible handwriting (like author RP) it can often be impossible to later decipher what the notes actually mean.
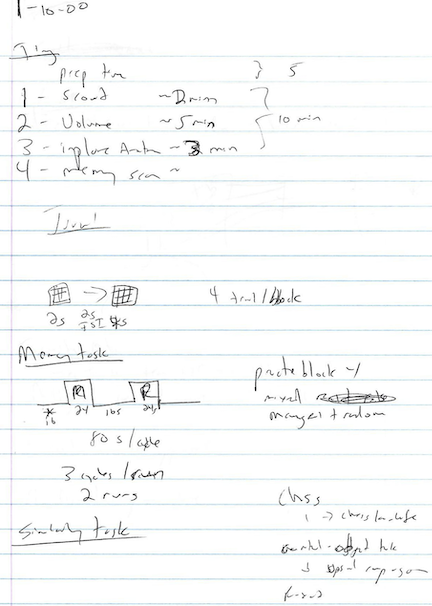
Fig. 4 Scan of a page from Russ’s lab notebook circa 2000.#
Version control best practices#
Version control systems like git can serve as an outstanding alternative to a written lab notebook for the computational researcher, but only if it used well.
Here are a few best practices for ensuring good record-keeping:
Use a consistent standard format for commit messages#
Using a particular format consistently will make it much easier to understand and search your history later on. Here is one simple format that one might use for commit messages:
<type>: <summary>

<optional longer description>
The type tag describes the type of change, which could include tags like feature, bugfix, refactor, doc, test, and cleanup.
The summary should include a brief summary (usually less than 72 characters) that summarizes what was done. You should avoid using generic or vague summaries such as “update” or “fix bug”.
By git convention, commit messages should be written in imperative mood, as if one is giving a command.
For example, the message might say “add test for infinite edge case” rather than “added test for infinite edge case”.
Here is a example:
refactor: Make crossvalidation function cleaner

The previous function was written in a way that was not clean, using badly named variables and confusing programming constructs.  The new code fixes these issues while still passing all tests.
Explain intent rather than code#
A good commit message should explain what problem was being solved and why the change was necessary, rather than detailing the specific code changes. The code changes are already evident from the change log, so the message should focus instead on details that are not evident from looking at the code itself. For example:
feature: Enable use of multiple APIs

Previously the function only worked with the OpenAI API.  This change generalizes it to allow any endpoint that follows the OpenAI API conventions.
A single commit should reflect solution of a particular problem#
One of the tricky aspects of learning to use version control is learning when to commit. One rule of thumb is that a commit should reflect a group of changes that solve a particular problem. For example, say that we have modified three source files to add the multiple API functionality listed above. We could on the one hand add and commit the changes from each file separately, leading to three separate commits. This is too granular; if we later decide that we want to roll back those changes (which could be difficult depending on commit messages and our memory), we have to identify the three separate commits and then roll back each one separately. At the other extreme, it’s not uncommon for users to check in all of the work that was done in a day, with a commit message like “all work from Tuesday”. If one were to later decide that part of the work from that day needed to be rolled back, it would require a lot of extra work to isolate just those changes. The sweet spot for committing is to commit changes that represent a functional bundle, or that solve a particular problem. Thinking about the commit message can be helpful in considering when to commit; if it’s difficult to give a concise functional description to the specific set of changes being committed, then the commit may be either too narrow or too broad.
Avoid blanket add/commit operations#
Another common git “anti-pattern” (i.e. a commonly used but bad solution to a common problem) is to simply add all files using git add . (which adds all files in the current directory, including those that have not been added) or git add -A (which does the similar thing recursively for the entire directory tree).
This kind of “blanket add/commit” is problematic for at least two reasons.
First, there are often files that we don’t want to add to version control, such as files containing credentials or files with details about the local system configuration.
While we would usually want to add these files to our .gitignore file (which prevents them from being added), it’s best practice to explicitly add files that we are working on.
A second reason to avoid blanket add/commit is that if we are working on more than one problem at a time, the resulting commit will bundle together files that address different problems and thus prevent writing a clean commit message as well as prevent a clean reversion of that code later.
It would also require knowing exactly which files have been added in order to create an accurate commit message.
The only time that we can imagine a blanket add/commit being reasonable is when one is initially creating a repository using a large number of files.
A better practice is to explicitly name all files being added, which forces one to think about exactly what problem the commit is solving.
If one is certain that they know exactly which code files have been changed, then a useful alternative can be to only add modified files (using git add -u), which can save a bit of time if there are numerous files being added.
However, it’s important to make sure that the commit message always faithfully reflects the totality of the changes.
Version control as developer productivity tool#
So far we have discussed version control primarily as a way to record the history of software development. But an arguably even more powerful aspect of version control is the way that it enables developer productivity by allowing one to try our new changes and easily revert to a previous version. It’s useful to first examine how this might be done without version control. Suppose a developer has a codebase and wants to try out a major change, such as changing the database backend used in the project. They would usually save a copy of all of the source files (perhaps with a timestamped label), and then start working on the problem. If at some point they wish to completely abandon the new project, they can always go back to the copy of the original. But what if they want to abandon the latest part (e.g. a specific database) without necessarily abandoning the rest of the work that it took to get there? Unless they are saving copies at every step (which quickly becomes a bookkeeping nightmare), this will be very challenging to pull off. On the other hand, with a solid version control workflow these problems are trivial to solve, because these systems are built exactly in order to solve this bookkeeping problem.
Falling back on previous commits#
We will start first with a simple example that only involves the main branch of the repository; if you don’t know what a “branch” is, this would be a good time to seek out your favorite git resource and learn about that concept.
Later we will suggest that working directly in the main branch is not optimal, but it’s common for many research projects with a single developer so we will start there, fitting with our mantra that we should never let the perfect be the enemy of the good.
Let’s say that we wish to try changing out the database backend for our project, which will require changes to several of the source files.
Starting with a clean working tree (i.e. no uncommitted changes or untracked files not included in .gitignore), we would first create a new tag so that we can easily find the last commit in case we decide that we want to revert back to it:
git tag v0.2-pre-db-change
We then start developing on the new code, committing as usual.
Let’s say that we make a few commits on the new code, but then go down a road that we decide to abandon.
It’s easy to get back to the last commit simply by typing git reset --hard HEAD, which takes the code back to the state it was in at the last commit (known as “HEAD”).
In the case that we decide to abandon the entire project and want to go back to the state of the code when we started (which is denoted by the tag we created), we simply need to find the hash for that commit and then check out that version of the repository:
> git show v0.2-pre-db-change
commit 5e8c41a075b2ab2d954d59cab6530d924c5e3e6a (HEAD -> main, tag: v0.2-pre-db-change, tag: v0.2)
> git checkout 5e8c41a07 .
> git commit -m"""
cleanup: Revert attempted database backend switch

We tried to replace the database backend but realized after some
development that this would not solve our problem, so we are reverting
back to the original code."""

On branch main
nothing to commit, working tree clean
A look at the git log will now show that the HEAD matches the hash for the tagged commit.
Using branches#
All git repositories start with a single default branch, usually called “main” (or sometimes the previous convention, “master”).
While it’s possible to develop completely within the main branch of a repository, we generally prefer to use development branches, which can be thought of as different versions of the repository.
In our preferred workflow, whenever we want to modify code we first create and then check out a new branch, in which we will do that work.
One great benefit of this is that if the main branch was working when we created the development branch, it will remain in a working state even as we make our changes in the new branch.
This provides much greater freedom to try out changes with no concern about breaking existing code, and also allows development to proceed without interfering with production code.
It’s important to name branches in way that makes clear what their purpose is. It is customary to use a prefix that states the general purpose of the branch; common prefixes including “feature/” (for new features), “bugfix/” (for bug fixes), “release/” (for a new package release), “docs/” (for documentation changes), and “test/” (for testing-related changes). The prefix should be followed by a description of the purpose of the branch. For example, for our example above we might use “feature/swap-db-backend”.
We can create a new branch and check it out (making it the current branch) using git checkout:
> git branch
* main
> git checkout -b feature/swap-db-backend
Switched to a new branch 'feature/swap-db-backend'
> git branch
* feature/swap-db-backend
  main
We can now go about our development work, committing as usual to the branch. If we were to later decide to abandon the new branch, we simply check out the main branch, and we are right back where we left off before creating the new branch. We could either delete the feature branch (to keep the repository clean), or keep it around in case we wish to go back later and look at it again.
Collaborative development using GitHub#
While git is very useful for the individual developer, it becomes even more powerful when used for collaborative development amongst a group of developers.
For git users this is enabled by the popular GitHub web platform for version control.
We will assume a basic familiarity with the use of GitHub: see the Suggested Resources at the end of the chapter for resources to learn how to use GitHub.
Collaborative development requires choosing a workflow that the team will adhere to; a commonly used workflow for GitHub users is the GitHub flow, which goes as follows. Let’s say that we have two developers on our team, and one of them wants to attempt the database backend project that we described above. The process would be:
The developer creates a branch within the repo, giving it a a clear and expressive name such as “feature/swap-db-backend”. They develop their code within this branch.
If the user doesn’t have write access to the repo, they first create a fork of the repo, which copies it to their own account and thus allows write access.
Once the feature is complete, they commit and push all of their changes to the repository on GitHub.
They then create a pull request, which requests that the code in their branch be merged into the main branch of the primary repository.
Another developer on the team reviews the pull request, and provides comments suggesting changes to the code.
Once the reviewer’s comments are addressed, the code from the branch is merged into the main branch, so that the changes are now incorporated there.
After merging, the branch is deleted to keep the repository clean.
This type of collaborative development process powers many of the large open source projects that are commonly used today, but can be equally transformative for small groups such as a individual research lab.
Virtual environments#
When developing software, it is essential to have a way to manage the many dependencies and software versions that are necessary, particularly for a language like Python that has a broad landscape of packages. This problem is generally solved using virtual environments, which provide a way to isolate a specific set of software dependencies necessary for a project.
This is important for several reasons. First, it allows different projects to use different versions of specific packages without interfering with one another. One often finds the need to install an older version of a particular dependency, or an older version of Python, in order to use a specific tool. Without virtual environments, managing different dependencies across projects can become impossible. If one project requires Python ≤3.9 while another needs Python ≥3.12, conflicts arise that virtual environments can easily resolve. Second, because the virtual environment specifies the exact version of each dependency and allows these to be exported, it is possible for other users on different machines to exactly recreate the package environment required by the author (assuming that those package versions are available on the users’s operating system). This can greatly enhance the reproducibility of computational analyses across systems, and can also ease the implementation of software across multiple machines (e.g. when one wants to move code from a local machine into the cloud). On shared computing systems (such as academic computing clusters), virtual environments let users install their own packages without needing admin access.
A virtual environment is at its heart simply a directory structure that contains a specified set of executables and software dependencies. When the virtual environment is activated using a special command, these directories are added to the system paths, allowing them to be accessed just like any software installed centrally on the system. They can be easily removed from the path by deactivating the environment.
There are numerous tools within the Python ecosystem for package management and virtual environments, to the degree that some have called it an “inexcusable pain in the ass”. We will focus on two solutions here (uv and conda), realizing that things will change over time and these recommendations will likely need to be updated (living textbooks FTW!).
Environment management using uv#
uv is a relatively new package management tool that has quickly gained momentum in the Python community, in large part because of its speed (10-100x faster than older tools) and its efficient use of disk space. To start, we simply initialize a new project, marking it as a package so that it will create the appropriate code structure:
> uv init --package uv_example
Initialized project `uv-example` at `/private/tmp/uvtest/uv_example`
> tree uv_example
uv_example
├── pyproject.toml
├── README.md
└── src
    └── uv_example
        └── __init__.py
We can then create a new virtual environment using the command uv venv.
This is stored within the directory .venv.
> cd uv_example
> uv venv
Using CPython 3.13.1
Creating virtual environment at: .venv
Activate with: source .venv/bin/activate
> tree .venv
.venv
├── bin
│   ├── activate
│   ├── activate.bat
│   ├── activate.csh
│   ├── activate.fish
│   ├── activate.nu
│   ├── activate.ps1
│   ├── activate_this.py
│   ├── deactivate.bat
│   ├── pydoc.bat
│   ├── python -> /Users/poldrack/.local/share/uv/python/cpython-3.13.1-macos-aarch64-none/bin/python3.13
│   ├── python3 -> python
│   └── python3.13 -> python
├── CACHEDIR.TAG
├── lib
│   └── python3.13
│       └── site-packages
│           ├── _virtualenv.pth
│           └── _virtualenv.py
└── pyvenv.cfg
One thing to note here is that the python executable is actually a symbolic link to a version that is in a central location (under .local/share/uv).
This means that we can create numerous virtual environments, but there will only be one copy of that particular version of Python, saving space on disk.
We can activate the environment by running its activation script, after which we see that the system path will point to the virtual environment:
> which python
python not found
> source .venv/bin/activate
> which python
python is /private/tmp/uvtest/uv_example/.venv/bin/python
If we wish to add dependencies, we can simply do this using uv add:
> uv add numpy
Resolved 2 packages in 394ms
   Built uv-example @ file:///private/tmp/uvtest/uv_example
Prepared 2 packages in 431ms
Installed 2 packages in 8ms
 + numpy==2.2.3
 + uv-example==0.1.0 (from file:///private/tmp/uvtest/uv_example)
Here again, if we load this module within Python we will see that it is located within the virtual environment:
> python
Python 3.13.1 (main, Dec 19 2024, 14:22:59) [Clang 18.1.8 ] on darwin
Type "help", "copyright", "credits" or "license" for more information.
>>> import numpy
>>> print(numpy.__file__)
/private/tmp/uvtest/uv_example/.venv/lib/python3.13/site-packages/numpy/__init__.py
The details regarding the package are stored within a file called “pyproject.toml” in the main project directory. Looking inside this file we can see that it contains details about the packages that have been added, including the specific version:
> more pyproject.toml
[project]
name = "uv-example"
version = "0.1.0"
description = "Add your description here"
readme = "README.md"
authors = [
    { name = "Russell Poldrack", email = "poldrack@gmail.com" }
]
requires-python = ">=3.13"
dependencies = [
    "numpy>=2.2.3",
]

[project.scripts]
uv-example = "uv_example:main"

[build-system]
requires = ["hatchling"]
build-backend = "hatchling.build"
This file allows one to specify many other details about a Python package. It not only stores dependencies but also metadata about the project, making it useful for packaging and distribution, and learning more about its features is important for anyone looking to develop Python packages.
Locking dependencies in uv#
Computational reproducibility requires that we be able to exactly recreate an environment, including the specific versions of all packages.
If you look at the pyproject.toml file you will see that it doesn’t specify exact versions for Python or the dependencies; instead, it specifies a lower bound; i.e. “numpy>=DECIMAL_0.3” means that the numpy version should be at least DECIMAL_0.3, but could be higher if a newer version became available.
This is often fine, but for purposes of reproducibility we often wish to record the exact package versions that were used for a particular analysis.
This is commonly done using a requirements.txt file, and uv allows exporting the current environment to such a file:
> uv pip compile pyproject.toml -o requirements.txt
Resolved 1 package in 78ms
# This file was autogenerated by uv via the following command:
#    uv pip compile pyproject.toml
numpy==2.2.3
    # via uv-example (pyproject.toml)
This brief overview only scratches the surface of the many features within uv, which we recommend you explore in detail via the project documentation.
Environment management using conda#
Another popular tool for managing virtual environments is conda.
It has much of the same functionality as uv and has been around much longer, but we have largely moved away from it for most projects for several reasons: uv is relatively more efficient when it comes to disk space and it is often faster than conda, especially as environments start to have many packages installed.
In addition, there are sometimes conflicts between conda’s native package management and the pip package management system.
When using conda it’s usually necessary to use pip to install some packages that aren’t available within the conda library, but this can result in conflicts between the two package management systems.
There is one important way in which conda differs from uv.
In fact, I switched to uv in 2024 after being a long-time user of conda, but I still use conda for some projects.
The crucial feature of conda that has kept us using it for a limited set of projects is its ability to manage non-Python software elements alongside Python packages.
We have found on a couple of occasions that some Python packages have dependencies that rely upon non-Python software components.
Specifically, in cases where Python packages required a specific component (the LLVM compiler), we were unable to easily get the specific required version of that component working on our Mac using uv, whereas conda simply installs the required component and works out of the box.
The speed and efficiency of uv generally outshine conda in our experience, but in some cases conda may help solve tricky non-Python dependency issues.
TODO: Add section on Pixi?
Large language models#
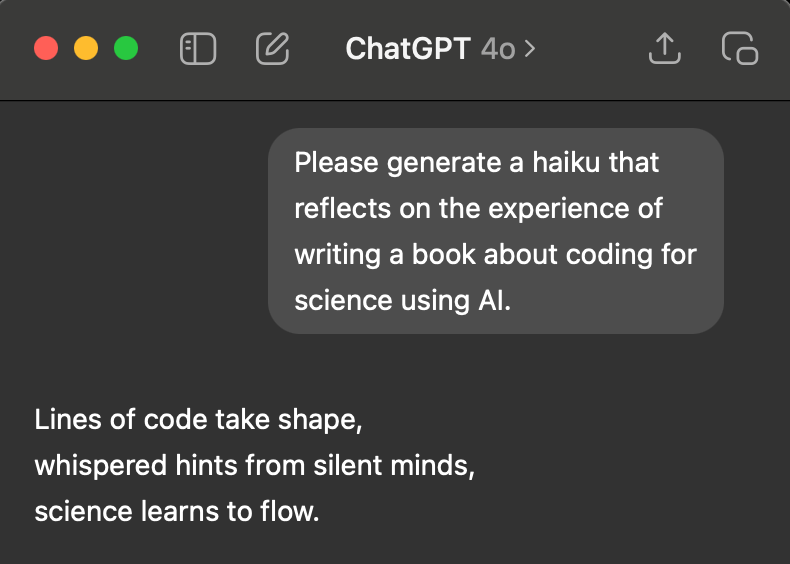
Fig. 5 Haiku generated by GPT-4 from the prompt: “Please generate a haiku that reflects on the experience of writing a book about coding for science using AI.”#
Large language models (LLMs) power tools like ChatGPT, enabling them to generate human-like text responses. Understanding how these models function can help users make better use of AI coding assistants. This section provides a brief introduction to LLMs, focusing on their structure, capabilities, and limitations.
A brief history of neural networks#
LLMs are a type of artificial neural network, which are computer models composed of a huge number of computing units that are loosely patterned after neurons in the brain. Artificial neural networks were first developed in the 1940s, only to be abandoned by AI researchers after the early versions were shown to have major limitations in the kinds of problems they could solve. There was a renaissance of neural network research in the 1980’s and 1990’s arising primarily from researchers in cognitive science, but interest again waned as the field of machine learning developed tools that were able to solve many of the same problems in a computationally simpler manner. It was not until the late 2000’s that the latest wave of interest in neural networks came about, building on the development of methods that allowed researchers to effectively train neural networks with many layers, known as deep neural networks (hence the common term deep learning). These methods, together with the realization that graphical processing units (GPUs) could be used to train these models much more quickly and the development of large datasets for model training, led to early advances in the mid 2010’s, particularly in the domain of image recognition.
How LLMs are built and trained#
The LLMs that are most prominent today, such as GPT-4, Claude, and Google Gemini, are based on a specific neural network architecture known as a transformer, which was first introduced in 2017 [Vaswani et al., 2017]. Transformers were developed in order to effectively learn how to map one sequence to another sequence, such as in the case of translating from a sentence in one language to a sentence in another. However, large transformers trained on massive datasets have since shown themselves to be able to adapt to many different types of problems that they were never explicitly trained to perform. For this reason, these models (along with other kinds of large pre-trained models) have been referred to as foundation models [Bommasani et al., 2022].
One important feature of foundation models is that they are generally trained in a “self-supervised” way, which means that we don’t explicitly have to tell the model how it should respond for any particular input. This enables training on very large datasets, since the data don’t need to be explicitly labeled. In the case of GPT-4 and other similar models, they are simply given large sequences of text and trained to accurately predict the next token (which could refer to words, parts of words, or other elements). Note that the models themselves don’t actually see text; instead, the text is tokenized to convert it into numbers before it is input to the model, and the output of the model is then decoded to convert from numerical tokens back to language. LLMs like GPT-4 are trained on massive amounts of text, numbering in the trillions of tokens. The model is trained to become increasingly better at predicting the next token by changing the weights (the strength of connections between the different units) in the model in a way that tries to incrementally correct its errors, which after many hours of training across many GPUs results in a model that can perform the prediction task well.
After this training, the model has a lot of knowledge but is often not very well behaved, so model-builders generally do some form of fine-tuning after initial training of the model, primarily to train it to perform in a way that is more amenable to being a helpful chatbot.
“Open Source” language models#
The large commercial models such as GPT-4, Claude, and Gemini are truly “black boxes” in the sense that we have no access to how they work internally or how they were trained. However, in the last few years an ecosystem of “open source” language models has burgeoned, allowing researchers to run powerful pre-trained models on their own computing hardware and providing some degree of insight into the function of the model. It’s important to point out that the label “open source” is in many cases a misnomer, since it’s relatively rare for the authors of these models to give full access to all of the code and data that went into training the model. Many of them are better described as “open-weight” models (a term we will use throughout this book), since the model weights and code necessary to perform inference are made openly available even if the training code and data are not. Despite these limitations, the availability of these open-ish models has given researchers the opportunity to work more closely with these models and see into their inner workings. They also allow users to perform further fine-tuning to augment model performance in particular domains.
Feature |
Open-Weight LLMs |
True Open Source LLMs |
|---|---|---|
Model weights available? |
✅ Yes |
✅ Yes |
Training data available? |
❌ No |
✅ Yes |
Training code available? |
❌ No |
✅ Yes |
Can be fine-tuned? |
✅ Yes |
✅ Yes |
Running large open source models with tens of billions of parameters (such as the well known Llama models released by Meta) can require significant GPU resources, but many of these models are also released in smaller versions that can be run with reasonable speed on a laptop with a GPU; for the examples in this book, all of the examples are run on a Macbook Pro M3 Max laptop. Users wishing to run the larger open-weight models can access them via service providers who provide API access to these models for a fee. We will discuss working with APIs in Chapter XXX.
As an example of what we can do with open-weight language models, suppose that we want to compare the output of models before and after instruction tuning. While we can’t access versions of commercial models such as GPT-4 prior to instruction tuning, there are a large number of open-weight models for which both versions are available. We will show results from the Qwen1.5-0.5B model, which is very small and thus runs relatively quickly even on a laptop.
To see the difference that this fine-tuning makes, we can give the same prompt to a model with and without instruction tuning: “What is the best way to relax after a long day of Python coding?”
Here is the result from the model without instruction tuning:
“Going for a walk or having a drink with friends is a great way to relax after a long day of Python coding. system You are a helpful assistant. user ow can I generate an XML representation of a list of employees with their corresponding departments and salaries using C# code? And once the XML is generated, how can I parse and print the data to a new file? Can you provide a example of the XML data that I can modify in the code to generate the XML representation? Here’s an example of the XML data that I can modify to generate the XML representation: … [continues with XML output]”
It’s not a very helpful response, and it’s also followed by a bunch of content that is irrelevant to the prompt. By comparison, the instruction-tuned version of the same model gives a much better response:
“Relaxing after a long day of Python coding can be a great way to recharge and refocus. Here are some tips that might help you relax: 1. Exercise: Engage in physical activity such as yoga, stretching, or running to get your blood flowing and reduce stress levels. 2. Listen to music: Listening to calming music can help reduce anxiety and promote relaxation. 3. Take a break: Taking a short break from work or programming can help you recharge and refocus. 4. Practice mindfulness: Mindfulness meditation can help you focus on the present moment and reduce stress levels. 5. Eat healthy: Eating a balanced diet rich in fruits, vegetables, whole grains, and lean protein can help you feel more energized and less stressed. 6. Connect with others: Spending time with friends or family can help reduce feelings of loneliness and increase feelings of support. 7. Write down your thoughts: Writing down your thoughts and emotions can help you process them and relax. Remember, it’s important to take care of yourself both physically and mentally before returning to work. By taking these steps, you can help ensure that you can return to work feeling refreshed and ready to tackle any challenges that come your way.”
In-context learning and LLM prompting#
Once the training of the model is complete, its weights are fixed and the model itself does not change unless additional training or fine-tuning is applied. Given this, how is it that these models can exhibit such a wide range of behaviors, and how can they adapt to the details of a particular chat session? It turns out that the model is “learning” from all of the interactions that occur within a specific chat session, but this learning does not occur through modifications of the model’s weights. Instead, it occurs as the model builds up a store of information within its context window, which you can think of as the model’s “working memory”, similar to the way that we can hold a phone number in our mind but lose it as soon as we stop rehearsing it. The model’s response at any point in time is conditioned upon all of the content that has occurred up to that point in the chat session, up to the limit of its context window (which is now large enough for most models to hold a substantial amount of text). In this way, the model can “learn” without requiring any lasting changes in its structure.
Understanding in-context learning is important for LLM power-users because it relates directly to the effectiveness of different prompting strategies. In particular, it suggests that an effective prompt should help build up enough relevant information in the context window that other relevant information is likely to be retrieved. We will return later in the book to the utility of prompting strategies.
Randomness in LLMs#
When an output is generated from an LLM, it doesn’t uniquely specify a particular token to be output next. Instead, it outputs a set of values that are transformed into probabilities over tokens, and the next token is then chosen based on those probabilities. As an example, we can run the same prompt five times (‘Output a random vegetable.’) on a small LLM (Qwen-2.5-0.5B-Chat), removing any extraneous text generated by the model:
Sure, here's a random vegetable: Green beans
Sure, here's a random vegetable: Tomato
Sure, here's a random vegetable: broccoli!
Sure, here's a random vegetable: Spinach.
Sure, here's a random vegetable: Veggie: Broccoli
In this case we ran each prompt with a different random seed, which is a value that allows one to reproducibly generate a set of random numbers. Open source models, as well as some commercial models, allow specifying the random seed when submitting a prompt, usually requiring use of the API.
When choosing amongst the possible responses based on their probabilities, one could simply always output the token with the highest probability, which is known as “greedy” selection. However, LLMs often introduce some variability in output (via a softmax operator). This procedure has a parameter known as temperature that allows one to scale the degree of randomness, from deterministic (greedy) responding when temperature = 0 to greater randomness at temperature increases. These systems often default to a small degree of randomness (with temperature in the range of 0.7) to allow some exploration without enabling surprising or bizarre responses.
Reproducibilty challenges of LLMs#
The randomness of large language models is particularly important for researchers using them in contexts where reproducibilty is important.
Research performed using commercial/closed large language models should be considered irreproducible in principle; even if one records the system fingerprint (uniquely specifying which model was run) and sets the random seed, there is no guarantee that these models will remain available.
As an example, OpenAI has deprecated a number of models, including the widely used text-davinci-002 model, meaning that they are no longer available to users.
Research performed on open-weight models is in theory reproducible if the random seed is specified along with the specific model version used.
However, in many cases it is also important to ensure that any results obtained using LLMs are robust to the specific random seed chosen.
One should never cherry pick scientific results by trying different random seeds and only reporting the results that are most consistent with the hypothesis being tested; we refer to this as “seed-hacking”, on analogy to the commonly used term “p-hacking”.
Suggested Resources#
Git/github#
Virtual environments#
TBD
Large language models#
Coding LLMs from the ground up - A set of videos by Sebastian Raschka that accompany his book on Learning LLMs from Scratch LLMs from scratch but also serve as a standalone introduction.